Lemon Chicken with Sausage on the Side

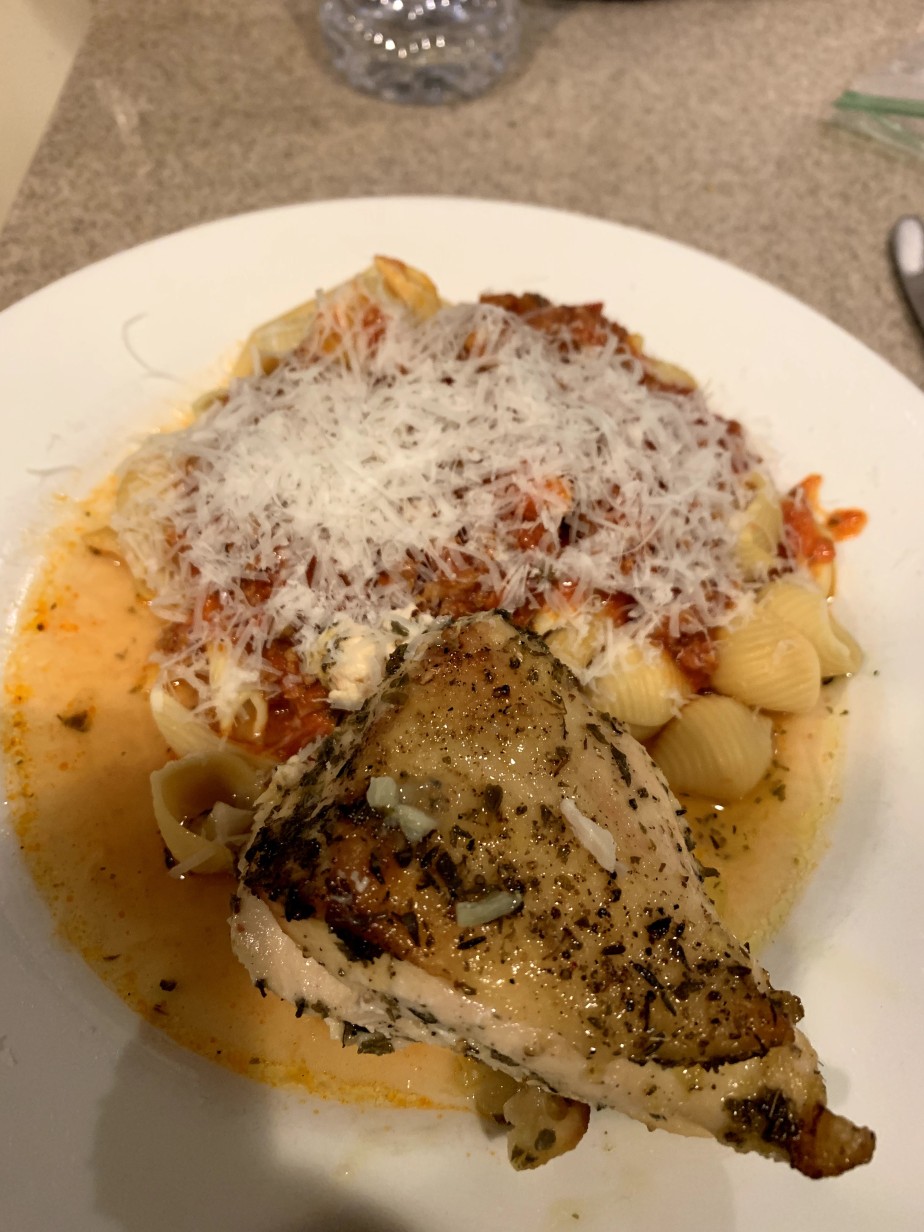
There’s nothing like the flavor of thyme and lemon, especially when you add a little wine and chicken breasts.  The lemon-garlic and thyme flavor of this chicken dish is just simply perfect.  It’s quick and easy and it pairs really well with a sauce of plum tomatoes and sausage (and a little more wine doesn’t hurt!).

The chicken is a recipe that has been adapted from Ina Garten, who is always a big on simplicity and flavor.  I love this recipe because it incorporates tastes that work any time of year.  It’s moist, herbaceous, simple, and quite beautiful when done. It calls for chicken breasts with the skin still intact.  I find this difficult to locate at your general grocer, so I buy split breasts and cut them from the bone.  I had my cooking partner, Robbie, with me on this one last night and showed him how to separate the two with ease.  A job well-done!

IMG_0453


The Crushed Tomato Sausage sauce for the pasta is also a very simple and perfect addition.  It is based on a recipe from Rao’s Restaurant and I’ve used it for years but with some minor changes.  The original recipe calls for pappardelle, but I find any pasta works perfectly; in fact we used chick pea pasta with last nights rendition of this full-flavored side.  The recipe also calls for hot sausage but I’d rather be the one in control of the heat, so I used sweet sausage and Sriracha to taste as a way to add heat with a light touch.  Worked perfectly.  Here are the recipes:


Lemon Chicken with White Wine and Garlic (serves 8-10)

Ing
4 T olive oil
8 garlic cloves, minced
1/2 cup white wine
1 lemon zested and juiced
2 tsp dried oregano
2 tsp dried thyme
Salt and pepper to taste
3 split breasts, separated from bone and cut into 2 pieces each
(or 6 breasts with skin intact)
1 lemon cut into thin wedges

1. Add oil to pan and heat.  Then add garlic for 1 minute and remove from
heat.
2.  Add white wine, half of the spices including salt and pepper, lemon 
juice and zest; add to large casserole
3.  place chicken, skin side up, into casserole and season with remaining
spices and salt and pepper.
4.  place lemon wedges in between each breast
5.  Bake @400 for 30 to 40 minutes, until done and nicely browned.  Remove 
from oven and cover with foil to rest for 10 minutes
6.  serve on platter with juices on side.


Crushed Tomato Sausage Sauce with Pasta

Ing
12 Sweet Italian sausage links or two packs of sausage filling
4 T olive oil
6 shallots
2 C dry white wine
2 cans crushed tomatoes 
4 T fresh basil
1 tsp dried oregano
Sriracha to taste
Salt and pepper to taste
Pasta of choice
Grated Romano

1.  Add oil to large sauce pot and heat
2.  sautee shallots until softened, but not browned
3.  add sausage filling and break up as you cook
4.  add wine, bring to a boil and reduce by 1/2 to 1/3, lower heat
5.  Add tomatoes and spices and return to a boil then simmer for 20-30 minutes 
uncovered to thicken; add sriracha to taste
6. Simply add to your favorite pasta, top with some freshly grated cheese
and enjoy!


Biscotti by Two…Two Robbie(s) That Is.

One of my favorite cookies anytime of the year is a well-made biscotti.  Not overly sweet yet crispy and full of flavor.  Every year at the holidays I try to work with a new recipe that gives a new flavor profile to this beloved confection.  This year, I incorporated the help of my same-named cooking buddy, Robbie.  We thought we add some holiday baking to the list of things we’d like to try to create together.

A few years back, Jerry and I took a cruise with a stop in Bar Harbor, Maine.  As with many cruise ports, we like to just get off the ship and wander around looking for inspiration and new discoveries.  In one of the small shops, I found a book of biscotti recipes.  It’s a small one, but loaded with possibilities.  From this book, I forwarded a couple of potentials to Robbie and we decided on a lemon, Fig, and pistachio recipe.  It incorporates many of the flavors that we both enjoy!  A few hours of baking fun and a well-balanced division of duties and our new favorite biscotti was complete.  The lemon comes in the form of extract, but is well paired with some vanilla.  The fig adds an earthy sweetness and the pistachio a welcome nutty crunch.  All-in-all it was an afternoon well spent and very much enjoyed.   There’s bound to be more coming from this kitchen duo, so stay tuned!

16e74b73-c0e1-4b8c-899a-ae05d80a134a


A few notes on this cookie:

  1. If you prefer a bite sized treat, feel free to roll these into 1.5 inch loaves
  2. Give the nuts and the figs a rough chop, but not too small, you want to enjoy the depth of flavor that they add
  3. For added lemon zing, try adding a little zest to this recipe, maybe from 1/2 lemon
  4. Don’t be afraid to use flour to keep your logs from sticking!


A Twist On Banana Bread

IMG_1146

Many years ago when I was but a young cook, a friend of mine whose cooking and baking I admired greatly (Eric, you know who you are) shared with me his banana bread recipe.  I’ve used that recipe for the last 25 years.  It has served me well. Recently, however, I joined up on a Facebook page for like-minded cooks and bakers around the globe.  Possibly the best decision I’ve made yet.  It yielded great rewards and a couple of new, amazing friends.  This recipe belongs to Terry Walker, a recent connection made on this cooking page.  We’ve been sharing a few great recipes between us and when he offered up his banana bread as his very own creation, well, I just couldn’t resist giving it a go.  The results were outstanding.

A banana bread, in my opinion, should be tall, flavorful, moist, and even in color throughout the slice.  It should not require a mixer, if possible (my old one did, but it was a good, solid recipe).  Terry has made some unique decisions for his bread that makes it different and, well, better.   For starters, the oil has been replaced with, wait for it….mayonnaise.  Yup.  Great choice, too.  As I recall, there is an old bakers recipe for a very moist and flavorful chocolate cake that uses the same concept.  Another great choice is the use of cinnamon in the flour mixture.  It really complements the banana taste and because the recipe calls for 1/2 white sugar and 1/2 brown, the results are deeply flavorful.  But the treat to your tastebuds doesn’t stop there.  One of the best features here is the addition of toasted pecans.  I’ve always used either walnuts or pecans, but never toasted.  Wow!  Bravo!  The resulting taste is reminiscent of butter pecan ice cream on a banana sundae.  Just sweet perfection.  As I am writing this, it is baking in the oven and smells vaguely like pecan pie and ripe bananas throughout my home.  And my mouth is watering.


Thankfully, Terry has given me permission to post the recipe for this sweet treat.  I’ve doubled the ingredients because, well, you can’t make just one.  You’ll have to share with your neighbors (hi, John and Regina) and your baking buds (Hey there, Robbie!) and maybe even your office mates!

Terry’s Banana Bread                  Oven temp 350

Ingredients:
1 C melted butter
1 C mayonnaise
4 large eggs
2 tsp vanilla
4 medium bananas mashed
1 C white sugar
1 C brown sugar
1 tsp salt
3 C all-purpose flour
2 tsp baking soda
1 tsp cinnamon
1 C toasted chopped pecans

Prepare two 9″ bread pans with baking spray
1. Combine the wet ingredients, including sugars and set aside
2. Combine dry ingredients and sift or run through with whisk to
combine
3. Toast pecans in dry pan until fragrant
4. Combine wet ingredients with dry and mix thoroughly in as few
strokes as possible; fold in pecans
5. pour into each bread pan. Should be 2/3 full in each
6. Bake for 1 hour or until cake tester comes out clean
7. Cool on baking rack for 10 to 15 minutes then turn out to cool
completely

IMG_1276

Butternut Squash Hummus

F057315C-0821-4C0E-A0F8-BD643607F225


Today was one of those challenging weather days where you just want to spend the day inside and create.  Create was just what I did only this time with the help of a good friend and fellow cook with amazing talents, Robbie Allegra.  Robbie and I connected only recently through a mutually connected Facebook page for LGBTQ fans of food and cooking.  He liked a recipe of mine and we became fast foodie friends, offering up advice and compliments on our sweet and savory concoctions.

Today wasn’t any different.  I knew I wanted to make butternut squash hummus and found a recipe online that I thought might work, but Robbie had made this before and offered some advice.  With no actual recipe between us, I looked for a recipe with his suggestion of roasting the squash with cinnamon and nutmeg.  Ureka!  Thanks to Ina Garten, I had a base for my recipe.  Ina’s recipe called for roasted squash, cinnamon, lemon, garlic, pepper, sriracha, tahini, garlic, chick peas, and yogurt.  All topped with Maple syrup.   We had some changes right out of the gate.

We decided that tahini would offer a taste a bit too complex for what was supposed to feature the creamy, nutty flavor of the squash, so that was out. Roasting the squash, as well as the seeds, with cinnamon and nutmeg was a must.  I also added pepper and salt with a little olive oil.  Once roasted, the squash was processed with the juice of 1/2 lemon, garlic, more pepper, smoked hot paprika, greek yogurt, and chick peas.  This was neatly scooped into a ramekin and topped with some reserved squash, roasted seeds, and drizzled with honey.

The sweet and savory of this hummus was served with warmed pita.  Tonight’s choice was flax, oat bran, and whole wheat pita warmed in the oven.  Thanks to Robbie, this was a successful little project that will make it’s appearance at several of our fall dinner parties!

Butternut Squash Hummus

Ingredients:
1 small butternut squash cut into small squares; seeds reserved
1 Tsp cinnamon
1/4 tsp ground nutmeg
2 tsp olive oil
pinch of salt
1/2 tsp ground pepper
1 tbsp plain greek yogurt
1 can chick peas drained and washed
juice 1/2 lemon
1 small garlic clove
tsp salt
1 tsp smoked paprika, spicy
**if desired: sriracha, frank’s hot sauce, or a pinch of cayenne

1. Roast the butternut squash by mixing together first 6 ingredients and spread out into a cookie sheet in one layer. Bake at 375 F
until well roasted and soft.(roast seeds on same sheet) Set aside
for 5 min to cool
2. Reserve 1 Tablespoon of squash. In a food processor, process all remaining ingredients by pulsing until desired smoothness. Add water only if too thick.
3. spoon into serving dish; top with reserved squash and roasted seeds. Drizzle liberally with honey.
4 cut pita into triangles and heat or toast; serve with hummus.

Apple Pie!

IMG_0709

A few people have asked me for my recipe for making an apple pie.  So, I thought I probably should blog it.  I’ve posted blueberry pie and peach pie in other pages and you will find that the pastry for all three is exactly the same.  It’s tried and true for me and very simple, in fact, it goes together as quickly as boxed crust.  Apple pie is one of those things where simplicity makes the dish.

I’m a traditionalist when it comes to choosing apples.  I really like the tartness and firmness of Granny Smith apples, but occasionally I will mix it up.  The trick to a good mix is to stick with firm, tart apples as they will not dry out and become mealy.  A good mix might be 4 Grannies and 4 Honey Crisp.  The sugar and butter will balance any tartness and leave you with a pie that stands on its own.  Literally.  Also, most recipes that I have come across use a small amount flour or no thickener at all.  Of course apples have a lot in the way of pectin to firm up the pie after it is cooked.  I, however, still choose to use cornstarch here.  I just find that it keeps the juices firm without clouding it all up.  Spice is light as well.  I use half dark brown sugar (sort of a caramel taste when done) and half white sugar, with only cinnamon to taste.  Cloves and ginger are left out of this one, as it tends to make the pie taste like a hot cider and competes with any ice cream or whipped topping that you may choose. (Big fan of a good butter pecan ice cream or caramel gelato!)

When deciding on the amount of water for your pastry there are a couple of rules that I follow:  (1) ALWAYS use the coldest water possible (2) pour 1/2 of the water around the edge of your flour mixture, mix with a fork and add the rest as necessary (3) wetter is better than being too dry; keep that dough moist, but not too sticky. (4) flouring your work space is essential; don’t fear the flour.  As you roll, work in a circle and flip the dough before it gets too big (this prevents sticking to the work surface) until you reach the size you need.  That way you won’t have to piece things together. (5) Crimp the edges; place your left thumb and forefinger on the edge of the crust with your right forefinger in between, pulling each hand away from each other in the opposite direction.  This will give you a perfect ruffle.

When your pie is assembled, use an egg wash (1 egg with 1 tsp water) and liberal amounts of sprinkled sugar.  This will do two things. It will give you an even browning and will create a crisp top to your pastry that will even withstand the coldness of the refrigerator.

Click here for the recipes

42922247_10155995512750679_1267809302794469376_n42821319_10155995512800679_1847580302357037056_n

Chicken And Rice, En Français!


My neighbors, John and Regina, do quite a bit of traveling with a student group that they’ve formed. On last year’s trip they spent some time on the french riviera.  Lucky! As the cook for our usual dinner foursome, I was rewarded with a ceramic mill filled with herbs de Provence.  It’s a wonderful savory mixture of many things we all use such as thyme, oregano, lavender, parsley, and tarragon.  My favorite replacement mix comes from my favorite purveyor of spices, The Atlantic Spice Company.  It’s one of our stops on our twice yearly trips to Provincetown.  And it’s perfect for a house favorite dish, Chicken Provençal.

Chicken Provençal is made with bone in chicken thighs, trimmed of excess skin (skin is important here, as the browning adds to taste, texture, and appearance).  The chicken makes it’s own sauce with flavors of lemon, garlic, shallots, and of course, herbs de Provence.  It’s succulent, moist, and complex.  I always pair this with a rice dish.  My personal recipe for a rice pilaf-Carolina jasmine rice with sautéed onion, mushrooms, zucchini, and yellow squash and flavored with thyme and a drizzle of truffle oil.  If you’ve never had truffle oil you must give it a try.  It’s like butter on steroids and too much can be too much as a little goes a long way.  And of course dessert, following the french theme is usually a french apple tart. (All recipes to follow)

Last night, I had the pleasure of entertaining a few friends from high school and since we had 30 years of catching up to do I thought I’d let the guests do some of the cooking.  Heidi has been wanting to try this recipe, so I said I would let her and Cindy build it when they showed up.  Having your guests do a little of the work is actually a great way to share a favorite recipe.  It’s also a great to get some fun pics!  While they worked away on assembling the chicken, I demonstrated the rice pilaf.  I completed dessert ahead, as it was the most time consuming.  They did a formidable job! It was a great night of friends, food, conversation, and music.  We’ll have to do it again soon!

Chicken Provençal (4 servings)(adapted from NY Times)

Ingredients

8 bone in chicken thighs with skin trimmed
1 lemon cut into 8 wedges
2 large Shallots cut into 8 to 10 pieces total
4 cloves garlic split into 2 pieces
2 T olive oil
1/2 cup white vermouth or dry white wine
herbs de Provence
salt and pepper to taste

1.  Heat oven to 400
2.  place oil in large casserole and tip to coat bottom completely
3.  flour trimmed chicken and shake off excess.  Place side by side
into the casserole
4.  Tuck the lemon, shallots, and garlic in between each piece
5.  top with salt, pepper, and herbs de Provence
6.  pour on wine or vermouth (should be about 1/2 way up sides)
7.  bake for 25 minutes, then baste.  Bake for an additional 25 min
8.  Arrange nicely on a platter, using the lemon wedges to present
but remember to pour the sauce into a gravy boat as your guests will
want more!

Rice Pilaf

Ingredients

2 cups Carolina Jasmine rice
2 T butter
1/2 white or yellow onion
1.5 cups coarsely chopped mushrooms
1 small zucchini cut into small squares
1 small yellow squash cut into small squares
2 T white or black truffle oil (I'm partial to the flavor of white)
1 T dried thyme
Salt to taste

1. Cook rice by boiling 3 cups of water and 2 tablespoons of butter;
add rice and bring back to a boil; cover and simmer for 15 minutes.
Turn off when done.
2. While rice is cooking, sauté all veggies at once in 3 tablespoons
of good olive oil just until mushrooms are cooked and slightly 
reduced in size. Add in the thyme and cook for 30 seconds.
3. mix in rice and mix in the truffle oil. Salt to taste


French Apple Tart (adapted from Cooks Illustrated)

Ingredients

Crust
1 1/3 all-purpose flour
1/4 cup sugar
10 T melted butter
pinch of salt

10 apples of choice (I used Honey Crisp, but golden delicious work 
well)
4 T butter
1 T water
1/2 C apricot preserves
pinch of salt

1. Heat oven to 350. 
2. Mix all crust ingredients together to form a dough. Place 2/3 of
the dough into the bottom of a tart pan and press into bottom.  Press
the remaining into the fluted sides.  
3. Bake for 30 minutes on a cookie sheet on lowest rack in oven.  It should be a deep golden color.  
4. Remove from oven and cool on rack, but leave on cookie sheet
5. Peel and core 5 apples.  Cut into 8ths. 
6. Heat 1 T butter and water into a large frying pan; add apples and cook until pliable and translucent.
7. Remove apples from pan onto a sheet of foil and spread into one 
layer
8. Heat preserves in microwave until liquid.  Separate solids by 
pushing through a sieve.  
9.  Set aside 3 T of strained preserves for top of tart.  Add the 
remaining solids and strained preserves to the fry pan with the 
remaining butter.
10. Peel and core remaining five apples slice into eighths and cook
until mashable, 10 minutes or so.
11. Mash apples with a potato masher and cook another few minutes 
until mixture is tight and not watery.
12. Add mashed apples to tart.  Arrange slices in overlapping, 
concentric circles with thin side down into mashed apples.
13. Bake tart on cookie sheet for 30 minutes on bottom rack. Remove
 from oven and
heat broiler.
14. Brush tart with melted preserves (you'll need to reheat), 
avoiding the crust.
15. Place tart (still on cookie sheet) on middle rack, turning every 1 to 1 1/2 minutes until evenly browned on top edges of apples.
16. Remove and cool.  Tart is best the day it is made, but will keep
covered in fridge for a day or two.  Remove and uncover 2 to 3 hours before serving.

Not Your Average Egg Sandwich

IMG_0645


This weekend, I was at a friends house enjoying the company of several people that I graduated high school with 30 years ago!  Cindy, the host, offered me two dozen eggs from her hen house; beautiful and colorful eggs that reminded me of a favorite sandwich I love to make and that I thought I’d share.  A number of years ago my neighbor Regina’s mom and dad-in-law were visiting from New Zealand with the rest of her family from Canada.  One of the planned excursions was to go into New York City to see a show then have a late night snack at South Street Seaport.  It was here, at a New Zealand style restaurant, called Nelson Blue, that I found the most amazing fried egg sandwich.  This was a triple decker, club style sandwich that had the most interesting flavors-lime and curried mayo, fresh tomato, creamy avocado, crunchy and salty bacon, and some spicy arugula, and over easy eggs all on 3 slices of perfectly tangy sour dough toast.  I was careful to make note of each and every flavor as I was sure to recreate this sandwich very soon!

Well, my version is not a triple decker club, as I have found that to be a little too much sandwich to eat comfortably, but it does contain all of those amazing flavors.  I’ve also found that rye bread or sour dough adds a wonderful tangy addition when lightly toasted.  The sauce was a bit tricky, but simple seemed best in the end and a mixture of Hellman’s, fresh lime juice, curry powder, and chili powder seemed to work best. Oh, and if you can get farm fresh eggs like the ones I just used from my friend, Cindy, you won’t be sorry!  Here’s the recipe, but I’ll warn you ahead of time to have a few napkins ready since you may end of wearing some of that egg yolk!

Kiwi Fried egg sandwich

Yield: 2 sandwiches (adapted from a visit to Nelson Blue bar/restaurant, South Street Seaport…a New Zealand themed bar)

Ingredients:

4 fried eggs, 2 ripe avocado-sliced lengthwise, 1 tomato sliced thinly, crispy cooked bacon strips, baby arugula, curried mayonnaise (mayonnaise, lime juice, curry, cayenne, chili powder), 4 slices of well toasted whole wheat bread

assembly:

  1.  spread mayonnaise onto one side of each slice of bread
  2.  top 12 with arugula, tomato, two eggs, bacon
  3.  top with second piece of toast and cut with a serrated knife without pressing too hard or you will burst those yolks.

Serve with a salad made of romaine, arugula, tomato, olive oil and lemon vinagrette, shaved romano.

**To make the mayonnaise, combine 1 C mayo with tsp curry powder, 1 tsp chili powder, and juice of 1/2 lime (cayenne optional to taste)


When Your Favorite Color Is Blueberry Pie!


IMG_0723

Nothing says summer like a beautiful, sweet slice of blueberry pie and vanilla ice cream. It has to be one of my favorite desserts.  While out picking up some groceries for today, there just happened to be 4 pints left on the shelf.  I quickly grabbed them and my fate, at least for this afternoon, was quickly decided.  Blueberry pie it shall be.

A few years ago, I came across a recipe from Martha that gave me the greatest tip of all.  Out of the 4 pints of blueberries in the pie, 2 are hand crushed and mixed in with the whole berries.  This helps the blueberries to heat up more quickly and “pop” before the crust has a chance to burn or overcook.  To this I add 1/2 cup of sugar, the juice of 1/2 lemon, 1/2 tsp of vanilla, and for insurance, a scant 1/3 to 1/2 cup of corn starch.  The latter ingredient ensures that your pie slices will stand a little more firm and not spill out of the pie before you can serve each slice.  It may seem like a lot, but ripe berries can get very juicy.  If the berries are very soft and overly juicy when I crush them, I will tend to go toward the 1/2 cup, but I’m usually just shy of that.  Of course, if you like your blueberries a little more on the runny side, cut back to 1/4 cup on the corn starch.

The pastry is simple.  I’ve used it before in this blog for the peach pie recipe and a variation of it for the quiche-it has been my staple recipe for 20 plus years.  Here is the link to the Peach Pie blog page: Peach Pie and Crust, but if you have a favorite go-to recipe for pie crust just use that!  I like to make this pie with a lattice top, so split your finished pastry ball into slightly uneven halves with the smaller being rolled into a circle for the bottom crust.  And the top rolled into a wide rectangle in order to cut wide strips-you’ll need 8 strips total.  I like to cut mine with a serrated brass pastry wheel that I inherited from Jerry’s grandmother, but a knife will do just fine.

Simply roll and lay your bottom crust into a standard glass pie plate leaving 1/2 inch on all sides, fill with the blueberry mixture, and top with 4 strips, then alternate the next four by weaving them in in an angle (it just looks more interesting than straight across) making diamonds, instead of squares. Roll up both the bottom crust overhang and the strips, then using your thumb and forefinger on your left hand and your forefinger on your right push the side in with your left while simultaneously pulling with your right all the way around to create the rippled crust edge, brush with a water-egg mixture and top with white sugar (this will keep the pie crust crisp for a few days, not that your pie will last that long.)  Bake on a cookie sheet at 400 for 20 minutes, then 350 for 45 more.  Cool completely before serving.


Robbie's Blueberry Pie

Ingredients:
4 pints of blueberries
1/2 cup sugar
1/3 cup corn starch
juice of 1/2 lemon
1/2 tsp of vanilla
4 T butter, cut into small pieces
1 recipe double crust (see link above)

1.  roll out and place bottom crust into pie plate
2.  place 2 pints of blueberries into a large bowl and hand crush
well.
3.  Add the remaining blueberries, sugar, corn starch, lemon juice
and vanilla and mix well
4.  pour into pie shell and dot with butter
5.  roll out remaining dough into a large rectangle and cut into
8 strips to create a woven lattice; lay the first four strips, then
weave the last four in on an angle to create a diamond weave.
6.  mix 1 egg with 1 tsp of water and brush onto the crust then 
sprinkle with liberally with white sugar
7.  Bake at 400 for 20 minutes, then 350 for 45.  Pie should be
bubbly and puffy when ready to remove.
8.  Cool on a wire rack and serve when ready.

When You Just Can’t Eat Another Burger This Summer…

IMG_0684

Eat chicken!  Cordon Bleu on the grill that is.  Yup, sometimes I just can’t eat another grilled burger or hot dog, I mean just how many BBQ’s do you attend in the summer and the menu is pretty much the same.  There is a delicious way to change it up.  This recipe may not be unusual, but I’ll bet it’s not your typical BBQ fare. It’s a sweet-glazed chicken breast filled with honeyed ham and melty Swiss cheese.  Pair this with the string bean salad and you’ve just created a simple and elegant BBQ’d meal!

IMG_0685

I like to choose the plumpest whole chicken breasts, trimmed of any fat.  Each one gets a deep slit into the top side of the breast with a boning knife that I wiggle around carefully inside to create a deep, wide canal  that runs the length of the breast.  Be very careful not to cut too low or you will expose the hole to the underside and all of your gooey cheese will end up in your grill.  It’s best to insert the knife about 1/8 of an inch or so below the top of the breast to avoid this.  Be sure to slide in two of your fingers when done to assess the depth and width of your cut.  This will make filling the chicken much easier.

IMG_0671

I like to use deli ham that is cut thin but not chipped.  My typical choice is to use honey-ham and prefer to roll this around slices of gruyere, but deli sliced baby swiss works nicely, too.  Place the cheese on top of two slices of ham and roll as tightly as you can, this will make it easy to slide into the breast.  The slippery quality of the ham will help you push this meat roll into each breast.  No need to seal the slit in the breast, as your meat rolls should be deep set enough not to leak.

IMG_0670

For the glaze, empty a jar of good orange marmalade into a small saucepan, add 1/4 cup of honey, 2 Tbsp of prepared dijon, a few shakes of Worcestershire sauce and thicken with 2 Tbsp of corn starch mixed with a small amount of water.  When cooled, just brush this on to each piece and grill.

IMG_0669

A note on grilling:  I have found that chicken remains best cooked if started on tin foil on the grill and then scored on the rack at the end.  If you don’t use the foil, you may end up with very dry chicken.  For this recipe, add more sauce to each breast just before scoring…you can’t add to much of this stuff!

Grilled Chicken Cordon Bleu

Ingredients for chicken:

4 Chicken breasts
8 slices of thinly sliced honeyed ham
4 slices of cheese; gruyere or baby Swiss

Ingredients for Sauce:

1 jar of orange marmalade, or Apricot jam
2 T of prepared Dijon Mustard
1/4 C of honey
2 shakes of Worcestershire sauce
2 T of corn starch

Sauce:
1.  Add the first 4 ingredients to a small saucepan and melt down
over low heat
2.  when melted, mix corn starch with a small amount of water and 
blend into the sauce to thicken.  
3.  leave to cool.

Chicken:
1.  place the cheese on top of the ham and roll into 4 tight rolls 
and set aside
2.  using a boning knife or any thin, long knife cut slits into the
top side of the breasts, pushing into the length of each breast and
sliding the knife back and forth to create a deep, wide pocket; 
assess the depth and width using two fingers.
3.  slowly push your meat rolls into each breast slit, be sure to 
push deeply enough so that nothing remains on the outside of the 
chicken
4.  brush each breast liberally with sauce and place onto tin foil
on a pre-heated grill; 12-15 minutes, flipping once
5.  Brush on more sauce.  Lower the heat a bit and move off the 
foil to the grill racks to score for another 12 minutes; 6 minutes 
on each side. (you'll need to adjust the times for the thickness
 of your breasts)
6.  Brush with any remaining sauce.  Breasts can stay in a warm oven, if necessary.
7.  Cut each breast in half to serve

String Bean Salad

Ingredients:
1 bag of whole, fresh string beans
1/2 small red onion
6 leaves of basil
3 T red wine vinegar
6 T olive oil
pint of cherry tomatoes sliced in half
salt to taste

1.  steam string beans for about 3 to 4 minutes or microwave bag
according to the instructions, following the minimum time.  (you
want the beans to still have a snap to them)
2.  cool string beans with cold water and drain well
3.  place beans in large bowl, add vinegar and oil
4. chiffonade (roll together and slice, thinly) the basil and slice 
the onion into very thin slices and add along with tomatoes
5.  add salt as desired and mix well


A Tale of Two Crumb Cakes

Mission:  Create a crumb cake that rivals those that I’ve enjoyed from a variety of bakeries in the New Jersey/New York area; one that isn’t semi-homemade and doesn’t involve cake mixes or fussy yeast breads.

I love living in the Tri-State area and having access to some of the best baked goods anywhere.  Mostly, I recall the delicious crumb buns of my youth with giant crumbs that overtake the base layer cake, one that was usually more of a sweet bread than a cake, actually.  And of course, we all love the ubiquitous Entenmann’s Crumb Cake (the original version!) with its moist cake bottom, buttery crumbs, and a hint of cinnamon.  My hope was to create one that was a combination of the two-a dense, moist cake bottom with soft, buttery, cinnamon-y crumbs that marry with a base that is there mostly to carry the weight of the crumbs and doesn’t interfere with the taste, just enhance it.

My first tries were unsuccessful.  I created a perfect base, but the crumbs were either too dry, not sweet enough, or too crunchy.  Soft was the goal here.  After 4 different attempts, I had to reach out to mom, who has a semi-homemade version of a crumb cake that I love; however, the base is too light as it’s made from a box cake-not my style.  I finally caved and asked for the recipe for her crumbs, as they are the consistency that I was looking for.  Here’s the catch, I wanted something I could assemble, pop into the oven and forget about until it was done.  In Mom’s version, the crumbs are placed onto the cake after a 15 minute pre-bake to set the bottom, then crumbed and placed back into the hot oven.  Lesson learned:  Listen to your mother!  The first try was a success.  I’ve since made a few small tweaks, based mainly on cooking time AND the addition of a chocolate version

I tested the cake out with my colleagues at lunch time and they jokingly said that I must keep trying (they of course wanted more, more, more!) and one suggested a chocolate version with chocolate drizzle.  Well, I like unique and have never come across this before, so I adapted my recipe and provided my lunch buddies with a chocolate version of the same cake.  That is the version that you see here.

Each of the cakes is identical, so if you just put in the chocolate or leave it out, you will create my version of the perfect crumb cake.  Do whichever is your preference.  I hope you love these as much as I do!

IMG_0410
Top view of chocolate version of My Perfect Crumb cake with a choco drizzle
My Perfect Crumb Cake

Cake:
1 1/12 plus 1/3 C of flour (Odd measurement, I know)
3/4 C sugar
1/4 Tsp salt
1 1/2 tsp Baking powder
1 stick butter, melted
1/2 C milk
1 whole egg
1 egg yolk

**if making the chocolate version add 4 Tablespoons of good unsweetened 
cocoa powder to the dry ingredients

Crumb
3 C flour
2/3 C white sugar
2/3 C brown sugar
1 T cinnamon
1 T Vanilla
1 1/3 cups (2.5 sticks) butter, melted

**if making the chocolate version, add 3 Tablespoons of good 
unsweetened cocoa powder to the crumb ingredients

1.  Combine all Crumb ingredients and mix well; set aside
2.  Combine all dry ingredients for the cake and blend with a whisk
3.  Combine melted butter, milk, and eggs and blend well
4.  Combine butter mixture with dry ingredients and mix only until 
all ingredients are combined with no dry spots.  This will be a thick
mixture.
5.  Prepare and 13x9 brownie pan or casserole and spread cake mixture across bottom; it will be a thin layer.
6.  Bake at 350 for 11 Minutes, remove and cool 5 (the cake will be
 mostly baked at this point, but will not be brown)
7.  After 5 minutes, crumble the topping onto the cake.  Be sure to 
get full coverage, but DO NOT press into the cake.  
8.  return to the oven for 12 minutes; remove and cool completely
9.  Using a small sifter, sift confectioners sugar over cooled cake 
(I do this in the sink to keep down the mess)
**If making a chocolate version, melt chocolate in the microwave and add 1/2
tsp of oil to thin out.  Using a small whisk or a fork "throw" the 
chocolate in quick flicks of your wrist onto the finished cake